While cleaning out my desk… (which is always a work in progress) I came across a package of HP iron on transfers. It was a great discovery because I hadn’t had much luck finding “new to us” Disney shirts for the boys for our upcoming Disneyland trip.
I always hunt for fun Disney shirts for the boys at local consignment stores. Buying the shirts second-hand helps us save money and also makes their shirts a little more unique because they aren’t the shirts that everyone is buying in the park.
My DIY “genius” came about when I decided to try my luck with the long forgotten iron on transfers. My first task was to find cheap plain t-shirts to use. I found 3 Hanes/Fruit of Loom shirts at our 99 Cents Only Shirt. Orange and green for Elliot and a turquoise one in Quinn’s size. Then I found a yellow on at our local consignment shirt for $1.99.
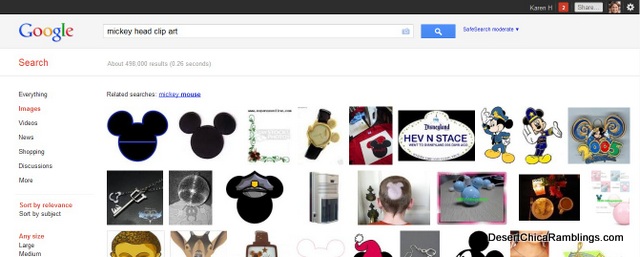
Next up finding some great t-shirt designs. I decided to go with KISS, a simpler design meant I’d have a better chance at success. So I started googling things like “Disney Clip Art” and “Mickey Head Clip Art”.
Easy DIY Custom Disney Shirts

Then I just used the “print screen” function on my computer to copy the images and paste them into my Paint program. I cropped the image and then inserted my text. I wanted the shirts to be personalized with the boys names and this was a very easy way to do that!
After I created a t-shirt image I liked I saved the file and opened it with my Word program. My transfer sheets were the size of regular sheets of paper. I played with the sizing and then did test prints on regular paper. Then I was able to test out the image size on my shirts.
EDITED – This process is much easier using an online program like PicMonkey. Just save the image you like and upload it into Picmonkey! Then add text and other overlays you like then save the image file.
Once I was happy with my design I printed the images on the special HP transfer paper. I made a HUGE mistake thought. Can anyone guess what I did??
Take a look at the picture above again and see if you can figure it out…..
The picture below is another hint.
I forgot to print the mirror image of the designs. The lesson learned is to read the directions on the iron on transfer paper. Some require you to print the mirror image design and others you print normal.
So my first set were a loss. But no biggie, I had more transfer paper left. I went back and changed the print settings to print the mirror image.
I trimmed each image, leaving a little edge around it.
Then I carefully centered each image on a shirt and followed the directions to iron on each transfer. The key seems to be time and pressure. Make sure you have enough of each!
The Moment Of Truth…
Was the transfer really going to work??

Yay! It totally did. I carefully peeled of of the paper backing and then did a happy dance around the kitchen!
What a fun spread of color!! I was so excited with the results!
Project Cost:
4 T-shirts $5 total
Iron On transfers free <—I did price out a package of iron on transfers at Michaels and they worked out to about $1 per piece transfer paper.
Project cost ~$2 per shirt depending upon what deals you find!
Theme Park Shirt Ideas
- LEGO Movie shirt perfect for wearing to the new LEGO Movie World at LEGOLAND California.
- Skip the costume for Brick or Treat and wear these fun witch minifigure LEGOLAND Shirts.
- Our first LEGOLAND shirts were a simple minifigure with their initial in it. Grab the LEGO decal template and make your own.
- For Universal Studios Simpsons fans, check out the simple shirts I made for our trip.
- For visits to Galaxy’s Edge at Disney you can make this BB8 shirt or Dark Side shirt.


Sara @ Mom Endeavors says
Adorable! Absolutely LOVE the “Quinnie the Pooh” and “Elliot too”!!! So, so, so stinkin’ cute! 🙂
Karen says
Thanks from one Disney geek to another! 😛
“Quinnie the Pooh” has always been our song for Quinn.. and now we sing “Quinnie the Pooh and Elliot too”! 🙂
Leyla C says
That is supper cute! <3 Great Job!!
Holly Crawford says
Karen these are awesome! So simple and chic! Lvoe them!
Kendra Forgacs says
I love this idea! I use iron-on transfers a lot: for race-day t-shirts and Halloween just to name a few!
jamie says
What kind of paint program did you use???
kc says
Just the basic Paint that comes with most computers. Nothing fancy. 🙂
Yessy says
WOW!! thank you sooo much for your advice and detailed step by step on how to make your own special Disney shirts. We are going to Disneyland Anaheim for a weekend this December and making these shirts will become a souvenir and a great memory for us… and the best part, at the fraction of the price I was willing to pay before. Thanks again 🙂
Happy MOM
kc says
Yay! I am so glad I could help! They are such an easy and inexpensive way to get cool Disney shirts.
Windy says
Awesome idea! We are going to Disneyworld this November, and I will definitely be using this transfer-method to personalize “cinch sacks” for each family member. Thanks for sharing : )
kc says
I am so glad you found it useful. It never occured to me before I made it how easy it could be!! I hope you have a fabulous trip!
Nicci Zak says
I can use the paint program that comes with Word..Is that what you used?
Karen says
I have used that in the past. picmonkey.com is a free website online that is awesome. I would recommend using that instead.